Table of Contents
- 1. Copyright
- 2. Installation from the Source Code on Various Platforms
- 3. Installation from the Prebuilt Binaries and Testing the Installation
- 4. How to Use HIP with Applications?
- 5. Name Look-Up
- 6. Using HIP Rendezvous and HIP Relay Server/Mechanisms
- 7. HIP Firewall
- 8. HIP NAT Traversal
- 9. Certificate Exchange
- 10. HIP dual-version support
- 11. Other Experimental HIP Extensions
List of Tables
- 3.1. Test Servers
, 2015 Copyright (c) 2010-2013 Aalto University and RWTH Aachen University.
Permission is hereby granted, free of charge, to any person obtaining a copy of this software and associated documentation files (the "Software"), to deal in the Software without restriction, including without limitation the rights to use, copy, modify, merge, publish, distribute, sublicense, and/or sell copies of the Software, and to permit persons to whom the Software is furnished to do so, subject to the following conditions:
The above copyright notice and this permission notice shall be included in all copies or substantial portions of the Software.
THE SOFTWARE IS PROVIDED "AS IS", WITHOUT WARRANTY OF ANY KIND, EXPRESS OR IMPLIED, INCLUDING BUT NOT LIMITED TO THE WARRANTIES OF MERCHANTABILITY, FITNESS FOR A PARTICULAR PURPOSE AND NONINFRINGEMENT. IN NO EVENT SHALL THE AUTHORS OR COPYRIGHT HOLDERS BE LIABLE FOR ANY CLAIM, DAMAGES OR OTHER LIABILITY, WHETHER IN AN ACTION OF CONTRACT, TORT OR OTHERWISE, ARISING FROM, OUT OF OR IN CONNECTION WITH THE SOFTWARE OR THE USE OR OTHER DEALINGS IN THE SOFTWARE.
Table of Contents
In addition to the HIPL userspace software, you need a Linux system with BEET IPsec support. You can install BEET IPsec by following one of the following methods:
Install kernel version 2.6.27 or higher which include already BEET support. Check your running kernel version with "uname -a".
If you have installed the prebuilt binaries, you can modify /etc/init.d/hipfw to contain the -i option (e.g. OPTIONS="-bklpFi"). Alternatively, you can run "hipfw" with the same options from the command line.
The HIPL library and header dependencies are not listed here. Read the INSTALL file to see what software you need to install before compilation of HIPL.
Network Requirements
Make sure that the end-host firewall does not block HIP and ESP traffic (try "iptables -L") or otherwise you won't get any traffic through. As a workaround, you try enabling the NAT mode at the end-host.
Make sure that a middlebox is not blocking HIP traffic. If there is firewall between the machines, it might have been configured to block HIP or ESP traffic. If there is a NAT between the machines, it might also be blocking traffic. Either make sure that the middlebox allows HIP and ESP traffic, or you can try enabling the NAT mode at the end-host.
You should allow also HIP related traffic in your firewall. For example:
iptables -A INPUT -p 139 -j ACCEPT
iptables -A OUTPUT -p139 -j ACCEPT
iptables -A INPUT -p udp --sport 10500 -j ACCEPT
iptables -A OUTPUT -p udp --dport 10500 -j ACCEPT
iptables -A INPUT -p 50 -j ACCEPT
iptables -A OUTPUT -p 50 -j ACCEPT
iptables -A INPUT -p 58 -j ACCEPT
iptables -A OUTPUT -p 58 -j ACCEPT
iptables -A INPUT -s 1.0.0.0/8 -d 1.0.0.0/8 -j ACCEPT
iptables -A OUTPUT -s -s 1.0.0.0/8 -d -s 1.0.0.0/8 -j ACCEPT
ip6tables -A INPUT -s 2001:0010::/28 -d 2001:0010::/28 -j ACCEPT
ip6tables -A OUTPUT -s 2001:0010::/28 -d 2001:0010::/28 -j ACCEPT
The last two rules basically allow the whole orchid namespace. You can set up more specific rules for HITs or use the hipfw to filter traffic (as explained in a later section).
SELinux should be disabled with HIPL in /etc/selinux/config (you have to reboot the machine after this). We don't yet have instructions for configuring SELinux. Contributions are welcome. Please note that default installations of AppArmor in Ubuntu work well with HIPL.
After you have successfully compiled and installed the HIP kernel and rebooted both of the hosts, you need to compile the userspace applications in order to use HIP. Start by moving to the top level directory of HIPL:
Where you run the following:
autoreconf --install
./configure
make
Next, install HIPL as follows:
make install
Note: the HIP configuration files are located in /etc/hip with the current set of options for configure. In contrast, the prebuilt RPM/DEB binaries store the HIP configuration files in the /etc/hip directory.
Note: you can optionally compile a binary (RPM or DEB) package with "make bin".
Some features are not compiled by default. Run "./configure --enable-FEATURE" to compile those. See "./configure --help" for a full list of options.
It is possible to include measurement code points in the HIPL code
with the --enable-performance configuration option.
If you want to profile HIPL source code, please refer to
http://www.cs.helsinki.fi/u/sklvarjo/gprof.html.
HIPL compiles fine on OpenWrt trunk and Backfire branch versions from the end of 2010 onwards.
To get an OpenWrt tree suitable for compiling HIPL, perform the following steps:
Get the OpenWrt backfire release branch:
$ svn checkout svn://svn.openwrt.org/openwrt/branches/backfireor get the OpenWrt trunk development version:
$ svn checkout svn://svn.openwrt.org/openwrt/trunkEnable package feeds in OpenWrt to get required dependencies for the HIPL firewall:
$ scripts/feeds update -a
$ scripts/feeds install -a
Make sure you have the requirements to compile OpenWrt installed on your system. Details can be found in the OpenWrt documentation.
To modify your OpenWrt tree to contain HIPL you need to
Build a dist tarball of HIPL in your HIPL tree:
$ make distAdd the OpenWrt packaging infrastructure for HIPL into the OpenWrt tree:
$ cp -r /path/to/hipl/packaging/openwrt/hipl/ /path/to/openwrt_checkout/package/Create the OpenWrt download directory in case it does not exist yet and copy the HIPL dist tarball into it:
$ mkdir -p /path/to/openwrt/dl/
$ cp /path/to/hipl/hipl-*.tar.gz /path/to/openwrt_checkout/dl/
Configure OpenWrt according to your needs, but make sure you select a Linux 2.6 target, otherwise IPsec will not be available and neither will HIPL. Enable either or both of
hipl-daemonandhipl-firewallin theNetworksection of the menu. Then compile.$ make menuconfig $ make
The OpenWrt build process takes a long time. If you just want to test HIPL compilation within OpenWrt quickly without triggering a complete build, run
$ make package/hipl/install
If you experience problems during compilation, add V=99 to the make command in order to get more detailed output.
HIPL currently has partial experimental support for the Android platform. The parts that currently work are hipd, the HIP daemon; and hipconf, the configuration tool. hipd does require root privileges, and your running kernel must support the IPSec BEET mode, the dummy network driver and the null crypto algorithm. Often one or more of these are not compiled into your stock kernel, and it is likely that you need to compile and install your own kernel. On our development devices we went ahead and compiled the whole OS; this procedure is documented in doc/hipl_android_preparation_guide.txt
Currently we only support compiling under Linux. We provide a script in tools/prepare_android_toolchain.sh that downloads and extracts the toolchain needed to compile hipd and hipconf and it has been confirmed to work at least on Ubuntu 12.04.
After HIPL source code is downloaded and the toolchain is installed, the steps to compile for Android are almost similar to normal Linux builds. You start with autoreconf --install; then you run the configure script:
CC=(path to android toolchain)/bin/arm-linux-androideabi-gcc
./configure --enable-android --host=arm-linux                      \
            --prefix=/usr    --sysconfdir=/etc
and run 'make'. If you are building for an Android version older than 4.1, add '--disable-android-pie' to the configure line.
After the build process completes, open a root privileged shell session on your phone and set up the environment:
adb root
adb shell
mount -o remount,rw /
mount -o remount,rw /system
mkdir -p /var/lock
mkdir    /etc/hip
ln -s /system/lib/libcrypto.so /system/lib/libcrypto.so.1.0.0
Afterwards, you can return to your normal terminal and push hipd, hipconf and the configuration in:
adb push hipd/hipd        /system/xbin
adb push hipfw/hipfw      /system/xbin
adb push tools/hipconf    /system/xbin
adb push hipd/hipd.conf   /etc/hip
adb push hipd/relay.conf  /etc/hip
adb push hipfw/hipfw.conf /etc/hip

for file in ${ANDROID_SYSROOT}/usr/lib/lib{netfilter_queue,nfnetlink,mnl}.*; do
  adb push $file /system/lib ;
done
On Android, hipd needs to be run with the '-a' parameter. Additionally it supports the same parameters as the normal Linux version does, i.e. '-k' kills an already running instance and '-b' starts hipd in the background. By e.g. running 'hipd -ab' and configuring hosts in /etc/hosts you should be able to use HIP on any program that supports IPv6. If you compiled all the required features into the kernel, instead of as modules, then the '-m' flag makes hipd ignore the fact that loading those modules fails. hipfw supports the same flags as on Linux.
As the root file system on Android typically resides on a ramdisk, the /var/lock folder is removed every time the phone is restarted. For hipd to run, it needs to be recreated by running:
adb root
adb shell mount -o remount,rw /
abd shell mkdir -p /var/lock
/system and /etc typically reside in persistent storage, so anything that is stored there should survive rebooting.
Table of Contents
The other sections of this document describe technical installation and usage of HIPL software in an elaborate way. This section gives more brief instructions for the brave and impatient.
The quickest way to install HIPL on your Linux system is to use precompiled release packages. Binary packages exist for a number of Debian and Red Hat based Linux distributions. Install the binary packages according to instructions on the download page: http://infrahip.hiit.fi/index.php?index=download
After installing all of the the binaries, you can test the installation by opening your web browser. Type http://crossroads.infrahip.net/ in the address bar, hit enter and wait a few seconds. If the web page tells you that the connection was established using HIP, then you have a successful installation, congratulations!
In November 2009 Linux Journal published on November 2009 an article on basic HIPL installation and usage: http://www.linuxjournal.com/issue/187
There are more test servers listed in the next section. If you have problems, continue reading. You can also ask questions on the hipl-users mailing list. Please include the output of the following commands when reporting bugs:
HIPL version: Ubuntu: dpkg -l 'hipl*', Red Hat-based distros: rpm -qa | grep hipl
hipconf daemon get ha all
ip xfrm state
uname -a
lsb_release -a
cat /etc/hip/hipd.conf
cat /etc/selinux/config
iptables -L -n
ip6tables -L -n
ps axu | grep hip
ps axu | grep dns
Below is a list of public InfraHIP test servers. Crossroads and ashenvale are also running HIP rendezvous service which you can use according to the instructions in Chapter 6, Using HIP Rendezvous and HIP Relay Server/Mechanisms.
Table 3.1. Test Servers
| Server | HIT | HI algo | IPv4 address | IPv6 address |
|---|---|---|---|---|
| crossroads.infrahip.net | 2001:1b:a9be:c6a6:34e5:8361:c07f:a990 | RSA | 193.167.187.134 | 2001:708:140:220::7 |
| felwood.infrahip.net | 2001:1d:392e:a450:2cd3:75e1:6098:8104 | RSA | 193.167.187.130 | 2001:708:140:220::3 |
| ashenvale.infrahip.net | 2001:1c:cbae:47ae:2871:f9c:eb94:c8e3 | RSA | 193.167.187.133 | 2001:708:140:220::6 |
The servers are running public HTTP service and respond to ICMPv4 and ICMPv6.
To access the servers over HIP behind a NAT box, you have two alternatives. First, you enable the UDP encapsulation using hipconf daemon nat plain-udp. See Chapter 8, HIP NAT Traversal for more information. Second, you can install miredo on your machine and make sure that HIP uses the IPv6 address of the server.
To register with rendezvous servers behind a NAT box, you need to install "miredo" on your machine. Then you register with one of the test servers using its IPv6 address.
You can use the hipconf tool to reset HIP SAs manually. Type hipconf daemon rst all to close all SAs.
This section is oriented towards hackers and developers. We will show how to connect two hosts using HIP to test your HIPL installation. The section starts with IPv6 test applications, continues with IPv4-IPv6 interoperability and concludes with IPv4 test applications.
We assume two machines called crash and oops that are in the same network. Crash is the one that starts communicating with oops. Substitute names and addresses according to your network configuration. It is possible to use IPv4 as well as IPv6 addresses on the wire.
You can test HIP with any networking application, but in this section we will demonstrate a few command line applications.
You should run nc6 with root privileges at the server side if the port number is less than 1024.
In this section we will use IPv6 addresses, but you can also use IPv4 addresses. Furthermore, the use of hipfw is optional.
oops:
ifconfig eth0 inet6 add 3ffe::2/64
hipd # (to start as a background daemon process, add -b flag)
nc6 -l -p 1111
Crash will act as the connection initiator, so we need to configure the hosts file of crash:
| File | Line to add |
|---|---|
| /etc/hosts | HIT_OF_OOPS oops |
| /etc/hosts | 3ffe::2 oops |
You need to run also the following commands at the crash host:
ifconfig eth0 inet6 add 3ffe::1/64
hipd
nc6 oops 1111
<Type some text in crash, press enter and you should see some text appearing in the output of the hosts>
This will setup a HIP connection between the two hosts (it may take a while if you are using virtual machines). You should replace HIT_OF_XXX with the HIT of the host XXX. The hip daemon loads (and creates if necessary) the host identities from /etc/hip automatically. If you want to know the default HIT of the localhost, run "hipconf daemon get hi default". You can list all HITs of the machine with "hipconf daemon get hi all". By default, you'll see only one. If you want to use all four HITs of the host, you have to invoke "hipconf daemon add hi default". The use of multiple local HITs is not currently recommended!
Mappings between HITs and IP addresses are usually set up automatically with the hosts files. Manual configuration is also possible but not necessary:
hipconf daemon add map PEER_HIT PEER_IP
You can also add the mapping to "/etc/hip/hipd.conf" and restart hipd. It is also possible to use DNS for the mappings.
Link local IPv6 addresses are not supported well, so do not use them. Use global IPv6 addresses instead for testing. The reason for this is that it is hard to know if the peer belongs to the same local network as we are or not.
One of the main advantages is that the conjunction of LSIs and HITs allows the communication between IPv4 and IPv6 applications. We will show an example using the configuration described in the IPv4 section of this section.
oops:
nc6 -l -u -p 5555
crash:
nc OOPS_LSI -u 5555
<Type some text, press enter and you should see some text appearing in the output of the host oops>
We can check also the opposite case.
oops:
nc -l -u 5555
crash:
nc6 OOPS_HIT -u 5555
<Type some text, press enter and you should see some text appearing in the output of the host oops>
Tips: Displaying log information and traffic.
For both, LSIs and HITs we can obtain more information about how they work showing more information messages with the daemons or capturing the network packets.
The log messages displayed by the hip daemon can be changed dynamically:
hipconf daemon debug none # <only HIP_DIE and HIP_ASSERT messages are shown>
hipconf daemon debug low # <shows HIP_DIE, HIP_ASSERT and HIP_ERROR messages>
hipconf daemon debug medium # <shows HIP_DIE, HIP_ASSERT, HIP_ERROR and HIP_INFO messages>
hipconf daemon debug all # <shows all messages, including HIP_DEBUG>
These options can be also set in "/etc/hip/hipd.conf" to configure hipd and other libraries at startup.
See the log messages for information about the result of HIP base exchange and USAGI IPsec negotiation. tcpdump or ethereal are good tools for dumping the network traffic during the base exchange. For tcpdump, you can use "tcpdump -n -i any esp or proto 139 or port 10500" to catch HIP-only traffic. It should be taken into account that LSIs are local identifiers, so they are not on the wire. If you prefer to see inside the ESP packets, you can use "tcpdump -n -i any net 2001:0010::/28", but please note that this displays only incoming datagrams, not outgoing.
Initial configuration.
We have different mechanism for mapping the HIT-LSI information. We can choose whatever of the next possibilities. The user can introduce manually the LSI or this can be created automatically by the hip daemon. It should be noticed that the address interval between 1.0.0.1 - 1.0.0.4 is already in use by the hipd, so the user must choose a free LSI. These four LSIs are the local LSIs assigned with the four local HITs.
crash:
Add the information in /etc/hosts
OOPS_HIT oops
OOPS_LSI oops Optional! If it's not defined, it would be created by the daemon
Add the information with hipconf daemon add map
hipconf daemon add map OOPS_HIT OOPS_IP [OOPS_LSI]
If the command hipconf daemon add map is not executed, we must add the peer IP in the file /etc/hosts
OOPS_IP oops
Apart from starting the hipd process, the hipfw process must be also started in both machines, oops and crash. Notice that hipfw must be started always before hipd!
hipfw -lA (to start the firewall with LSI support enabled and allow HIP/ESP packets)
hipd # (to start as a background daemon process, add -b flag)
Beforehand the following rules must be added in the file /etc/hip/firewall.conf
crash:
INPUT -src_hit OOPS_HIT ACCEPT
OUTPUT -dst_hit OOPS_HIT ACCEPT
oops:
INPUT -dst_hit OOPS_HIT ACCEPT
OUTPUT -src_hit OOPS_HIT ACCEPT
Running the application.
Once we have finished the step before and started running hipd and hipfw, we can run the application. If the LSI has been generated automatically, we can check its value with hipconf daemon get ha OOPS_HIT or hipconf daemon get ha all. Afterwards, we start running the application, e.g.:
ping OOPS_LSI
ssh OOPS_LSI
nc OOPS_LSI -u 5555 # oops must be running nc -l -u 5555
This section is targeted to developers and hackers. If you don't intend to hack some code, move on to the next section.
The handover code is based on RFC5206. Not all of the features are implemented yet and the code quality is still far from bullet proof.
A naive handover test example is below. It assumes that you have already established the base exchange between the hosts. You also need to have the nc6 tool which can be found from e.g. "www.freshmeat.net". The example is based on IPv6 addresses but you can also use IPv4.
<first, establish a HIP connection as instructed in the section called “For Hackers: How to Test HIP Connectivity from the Command Line using two Locally-Connected Hosts”>
oops # nc6 -l -p 12345
crash # nc6 <the HIT of oops> 12345
crash # <type some text and press enter>
oops # <the text that you typed in crash should appear in oops console>
crash # ifconfig eth0 inet6 del 3ffe::1/64
crash # ifconfig eth0 inet6 add 3ffe::3/64
crash # <type some text and press enter>
oops # <the text that you typed in crash should appear in oops console>
You can also trigger the handover message exchange without changing IP addresses by running "hipconf daemon manual-update". Note that this only simulates the message exchange that would normally occur on IP address changes and does not test handover detection.
Do not use link local addresses for the mobility scenarios for the hosts, unless you know what you are doing! For example, you are asking for trouble if you establish HIP SA between the mobile and correspondent node using link local addresses, and move the mobile node to a different network. The readdressing fails, because either node has no way of reaching the other node.
Make sure to add the route for the new address as soon as the new address is added. If the route is missing, the update packets might not get sent at all. The daemon waits for a couple of seconds if a transmit of an update fails for retransmitting it.
The network throughput using IPsec might be unnecessarily slow especially in wired, local-area networking (e.g. within a datacenter). You can tune this higher by enabling jumbograms in your switch and by increase the MTU of the virtual host interface (ip link dev dummy0 set mtu 8950).
Table of Contents
This section lists different methods on how to set-up HIP manually in order to make applications use HIP. We have categorized the local methods to "easy" and "advanced" here.
1. Run the hipdnsproxy to map hostnames transparently to HITs from hosts files and directory services (DNS). See the section called “DNS Proxy” for more details.
2. Overload your /etc/hosts files by adding HITs or LSIs before the corresponding IP addresses. This method does not require DNS proxy running on the host and works using hostnames.
3. You can also use HITs (or LSIs) directly in the application (DNS proxy is not required for this method). For example, you can execute "ping6 PEER_HIT". However, hipd must know the mapping from the PEER_HIT to the corresponding IP address. Hipd can find this mapping from DNS. Alternatively, this information can be stored in hosts files as follows:
3a. If you want to maintain separate files for HIP identifiers, write the HIT-hostname (or LSI-hostname) pair to /etc/hip/hosts and the IP-hostname pair to /etc/hosts. See also the method (2) for overloading all addresses in /etc/hosts.
3b. Execute "hipconf daemon add map PEER_HIT PEER_IP" and use the HIT directly in the application. You can insert the hipconf command without daemon keyword also to /etc/hip/hipd.conf and restart hipd.
In the deployment phase, it is interesting to set-up a proxy server that translates the TCP/IP traffic into HIP. For instance, this is convenient in HTTP proxy servers. Thus all HTTP traffic between our host and the proxy server will benefit from the usage of HIP.
First of all, you should have installed and configured properly your proxy server to employ HIP. This includes allowing HITs to connect the server (settings in the httpd.conf file) and restarting httpd using HIP. Configure the HITs of the proxy at the client as instructed in Chapter 4, How to Use HIP with Applications?.
You have several options to enable the HIP proxy within Firefox. In the menu Edit/Preferences/Advanced/Connection Settings, you can choose:
Direct connection to the Internet: To disable the usage of any proxy.
Auto-detect proxy settings for this network: To enable the auto-detection feature, you should configure the wpad.dat file that it is served by your proxy in the URL http://wpad.mynetwork.com/wpad.dat (or a similar one). The wpad.dat file should return the information of your HIP enabled proxy server at the end of the function FindProxyForURL(url, host).
Manual proxy configuration: To manually introduce the information about your HIP enabled proxy server. You should also identify the port number.
Automatic proxy configuration URL: To use a wpad.dat file that is not located in the default URL http://wpad.mynetwork.com/wpad.dat. With this feature, you can store a wpad.dat file in some other location of your server and Firefox will fetch it from this URL.
Once you have the proxy server, HIT configuration and Firefox ready at the client, you can access the web over the proxy using HIP.
HAProxy (version 1.3.22) has been successfully used with HIPL for web-based load balancing in in a cloud-based deployment. In the experimentation, the HAProxy translated non-HIP communications originating from clients into HIP-based connections to the servers. The HAProxy did not require any changes, and it was merely configured to use LSIs or HITs instead of IPv4 or IPv6 addresses. In the experiment, the hosts files were modified to contain both the identifiers and locators as described by method 3a in the section called “Easy Methods”. In addition, HIP daemon and firewall were installed at the host that was running HAProxy.
Sendmail works fine with HIP after you enable IPv6 in Sendmail. We did some experimentation with SpamAssassin to integrate it with HIP puzzle mechanisms. See spamass-sendmail-debian-v1.patch, README.SPAMASS.HIPL and spamass-milter-0.3.0-hipl-v1.patch for some examples of configuration changes and instructions.
Apache1 supports only IPv4, so it requires LSI support at the server side (include in the hipfw module). Apache supports also IPv6 and can make use of HITs.
You may have to bind Apache to the local HIT (or LSI). Alternatively, you can bind Apache to :: (or 0.0.0.0) to allow both HIP and non-HIP based communications. You can set the binding using the Listen directive, but probably want to specify local HITs (or LSIs) also to the NameVirtualHost and VirtualHost directives.
Apache may want to resolve all of the local IP addresses in its configuration, including the HITs and LSIs, and complains about unresolvable ones. You can solve this using two ways. Firstly, you can run the DNS proxy the section called “DNS Proxy” at the server. Alternatively, you can set the local LSIs and HITs in the /etc/hosts file manually.
Video LAN Client (VLC) is a software that supports playing and network streaming of multimedia. VLC can be used with HIP by using LSIs or HITs. These instructions show how to stream a video clip over HIP based on HITs. LSI-based connectivity works similarly as with HITs, but you should replace the HITs with LSIs and exclude the square brackets.
You need two computers with HIP support. First, start a vlc client on one computer that listens for incoming multimedia streams over RTP:
client % vlc -vvv 'rtp://@[::]:50004'
Then start a VLC server that streams the video to the client over RTP:
server % vlc -vvv somemovie.avi --sout '#rtp{mux=ts,dst=[HIT_OF_CLIENT]}'
The "HIT_OF_THE_CLIENT" should not be taken as literal. Replace it with the actual HIT of the client (run "hipconf daemon get hi default" at the client host).
It should be noticed that you can also specify the HIT_OF_CLIENT at the client instead of the wildcard (denoted "::"). This enforces also the client to accept only HIP-based connections.
The server streams data only the client specified at the command line. It is possible to stream to multiple clients using the "group" option in vlc.
At the time of writing, VLC did not support IPv6 multicast (ff01::1 or ff02::1) at the server side. It is unclear how such multicast would work in combination with HIP. Contributions on the topic are welcome.
In the case VLC seems insufficient for your purposes, we have also experimented successfully music streaming with Icecast earlier. Unfortunately, we don't have any documentation yet on this.
Vino-server/Vinagre-client and tightVNCserver/xtightVNCviewer applications work just fine with the LSI support of HIPL. LSIs are used because tested applications did not support IPv6. It seems that most of the VNC applications do not support IPv6.
Setup LSIs as the manual instructs and remember the daemons and so on. Then do the following.
For server side (Remember Ubuntu was used when testing). Open the settings GUI from Gnome System->Preferences->Remote Desktop then allow other users to view and or control the desktop. You can also set a password for the desktop.
For the client side do the following and everything should work.
vinagre <LSI-of-Server>
Setup LSIs as the manual instructs and remember the daemons and so on. Then do the following.
For the server side install package tightvncsercer. To start the server just write tightvncserver on the terminal and the server will start with default options. Refer to the official documentation or the man pages of tightvnc for more information on the configuration.
On the client side install package xtightvncviewer. Then with the following command you should have a successful connection.
xtightvncviewer <LSI-of-server>:1
Longer how-to can be found from http://www.cs.helsinki.fi/u/sklvarjo/vnc.htm
Tested with stable version openldap-2.3.38 and with release version 2.4.7. ACL part is tested using 2.4.11. Using OpenLDAP with HIP is pretty straight forward thing to do. Simplest way is to run hipd and on DNS proxy both machines and just use command like:
ldapsearch -x -H ldap://<fqdn> -b 'dc=<MY-DOMAIN>,dc=<COM>' '(objectclass=*)'
The name can be something found in /etc/hosts. Search can also be done directly with HIT by command
ldapsearch -x -H ldap://[<HIT>] -b 'dc=<MY-DOMAIN>,dc=<COM>' '(objectclass=*)'
You can search also by using the opportunistic mode by using command
ldapsearch -x -H ldap://<fqdn> -b 'dc=<MY-DOMAIN>,dc=<COM>' '(objectclass=*)'
Ldapadd can be used similarly with LDAPURI and HITs.
Maybe the most interesting parts are the ACL rules with OpenLDAP. In the newer versions you can use IPv6 formatted peername rules, so it is interesting when we remember that HITs are IPv6 formatted. Below is the basic example of a rule that grants write/read/search permissions to self, read/search permissions to all processes from HIT_1 without authentication and no permissions to the rest of the world.
      access to *
            by self write
            by peername.ipv6=<HIT_1> anonymous read
            by * none
Longer how-to can be found from http://www.cs.helsinki.fi/u/sklvarjo/openldap.htm
OpenVPN is an open-source virtual private network solution. To set up OpenVPN, you need to change the configuration file to contain the addresses used for the VPN. VPN traffic must be routed through the tun0 interface, and all other traffic directed through the default interface. No changes to iptables are needed.
A separate HIP and OpenVPN tunnel have roughly the same throughput. We have tested HIP inside an OpenVPN tunnel successfully by using the VPN addresses as locators for HIP. However, this seems to halve the throughput without any optimizations (such as using NULL crypto with HIP).
OpenVPN can be run over HIP. The main benefit of such layering is create a mobile OpenVPN tunnel. The VPN inherits also some other features from HIP, such as transparent NAT traversal. In other words, both end-hosts can be located behind NAT devices.
The instructions here assume that you have two hosts with OpenVPN and HIP installed. Furthermore, you should have a working configuration of LSIs between the two hosts as instructed in the section called “Testing a HIP connection with an IPv4-only application”.
This experiment uses OpenVPN from the command line. For real deployment, you probably want to modify the OpenVPN configuration file. Start OpenVPN at both end-hosts as follows:
openvpn --remote <REMOTE_LSI> --dev tun1 --ifconfig <LOCAL_VPN_IP> <REMOTE_VPN_IP> --verb 9
Then you can try the connection e.g. with "ping <REMOTE_LSI>". Note that the capitalized identifiers should not be taken literally. Replicate them with the local and remote LSIs and virtual VPN addresses according to your configuration.
This section describes how you can run NFSv3 over HIP. One benefit of running NFSv3 over HIP is that you can provide a stronger authentication using public-key based access control lists. A second benefit is that you can use NFSv3 to serve also mobile devices because the access control lists are based on location-independent public keys.
Linux has two NFSv3 server software, one operating in kernelspace and the second one in userspace. These instructions were tested on Ubuntu with the userspace NFS server (unfs3). For generic NFSv3 instructions, please see e.g. http://nfs.sourceforge.net/nfs-howto/.
As NFSv3 supports only IPv4, you need use LSIs. So, make sure that you are running also hipfw with the LSI support (-l) on both sides. For example, you can start it with "hipfw -lAbk" flags. Also, it is recommended to fix HITs and LSIs to /etc/hip/hosts and IP addresses to /etc/hosts at both sides. In this example, the NFS server has been configured to use LSI 1.0.0.1 and the client 1.0.0.2. Notice that the LSIs are valid only within the local host!
Configure the NFS server:
Install unfs3 and portmap
Make sure that your /etc/hosts.allow and /etc/hosts.deny do not contain anything else than comments. You can make these rules more strict after successful testing.
Add "/home 1.0.0.2/255.0.0.0(rw)" to /etc/exports and restart unfs3.
Configure the NFS client:
Install nfs-client and portmap
mount -t nfs 1.0.0.1:/home /mnt/
Now you should have mounted the NFS share over HIP. As the LSIs are bound locally to HIs, the NFS traffic is authenticated with public keys and encrypted using IPsec. The public key authentication supports mobile NFS clients.
Iperf is a network performance measurement tool. You can use it to measure IPsec performance with two locally-connected machines as shown below:
server % iperf -V -s
client % iperf -V -c <hit-of-the-server>
Notice that <hit-of-the-server> should not be taken literally. Replace it with the HIT of the server (run "hipconf daemon get hi default" at the server). If you want to use LSIs instead of HITs, you shouldn't use the -V option and use LSIs as instructed in the section called “IPv4 and IPv6 interoperability”.
TCP-over-IPsec performance was one fourth of UDP-over-IPsec performance in a gigabit network during the time of writing. It was unclear whether this was caused by a missing command line argument to iperf, a problem in iperf itself or a problem in IPsec performance.
Nagios is a web-based, open source Infrastructure monitoring service. Here is an example how to handle the monitoring over HIP based on the instructions in https://wiki.chpc.utah.edu/display/CHPC/Nagios+ping6+creation
Nagios supported "check_command check_http" over IPv6 and using HITs without any changes. However, you will need the following tweaks support HIT-based ICMPv6 (unless you are satisfied with LSIs):
    define command {
        command_name check_ping6
        command_line $USER1$/check_ping -6 -H $HOSTADDRESS$ -w 3000.0,80% -c 5000.0,100% -p 5
    }

    define command {
        command_name check-ipv6-alive
        command_line $USER1$/check_ping -6 -H $HOSTADDRESS$ -w 3000.0,80% -c 5000.0,100% -p 1
    }

    define service {
        use                     local-service
        host_name               crossroads.infrahip.net
        service_description     PING
        check_command           check_ping6
    }

    define host {
        use                     linux-server
        host_name               crossroads.infrahip.net
        alias                   crossroads
        address                 2001:1b:a9be:c6a6:34e5:8361:c07f:a990
    }
Vanilla telnet client can be used with HIP by giving it a "-6" flag to force IPv6 resolution. Then the connection can be made to HITs with syntax presented below.
telnet -6 <HIT-of-responder> <port>
The following link shows how to run torrent over HIP: http://www.cs.helsinki.fi/u/sklvarjo/torrent.html
The Linux libc library does not (yet) support look up of HI records from the DNS. As a workaround for this problem, HIPL provides a DNS proxy that intercepts DNS requests and handles the HI record look up. The proxy intercepts the DNS requests by overwriting itself into /etc/resolv.conf file. Then, the DNS proxy forwards all of the DNS requests to the server that was in the file prior to overwriting it. When the proxy encounters HIP records in DNS or hosts files, it returns them instead of the IP addresses to the caller.
The DNS proxy is single threaded, but asynchronous. It polls for changes in resolv.conf, stores the changes and rewrites itself there. The DNS proxy caches the results of DNS requests to reduce delays. To avoid loosing the mapping between a HIT and the corresponding IP address, the DNS proxy always this information to hipd (using hipconf). It sends this information always because there is chance that hipd was restarted or its state was reset.
The DNS proxy is useful especially for client hosts. However, running the DNS proxy on e.g. a SSH server or IRC server has the benefit that it speeds up logins. The server software will try to resolve the HIT of the client to a hostname and introduces an artificial delay to the client if the HIT was not found. Running DNS proxy at the server avoids this delay.
The DNS proxy tries to find host identities from two places, the "hosts" files or HI records in DNS. The /etc/hip/hosts file can be used to isolate all HITs or LSIs, or they can be overloaded all in the /etc/hosts file. If you prefer isolation to /etc/hip/hosts, you may have to change the "hosts" line in /etc/nsswitch.conf so that "dns" occurs before "hosts". In the case of DNS, the DNS proxy converts the HI records automatically to HITs and returns also LSIs to the application when requested. The DNS proxy handles the LSI conversion through hipd.
The DNS proxy can be run with or without resolvconf (in Ubuntu/Debian).
The DNS proxy does not yet autodetect other DNS related software running on the same host. If DNS proxy reports the error "Port 53 already in use. See HOWTO.", you can find out using netstat which process is occupying it. Dnsmasq is the most common problem, as it is started automatically by modern NetworkManager. It can be disabled by removing or commenting out the line "dns=dnsmasq" in /etc/NetworkManager/NetworkManager.conf and restarting NetworkManager. Another case is ISC bind. You should associate bind explicitly with the IP addresses (or HITs) you want to use. The DNS proxy occupies IP address 127.0.0.53 and as long as bind uses different IP address than DNS proxy, both can co-exist on the same host.
If you encounter a bug with DNS proxy and loose your DNS settings, just try to reconnect your machine to the network. If this does not help, try rebooting your host; in case you're running dnsmasq, dnsproxy repairs then /etc/default/dnsmasq file if DNS proxy crashed for some reason.
The DNS proxy has multiple options that you configure e.g. to DNSPROXY_OPTS variable in /etc/init.d/hipdnsproxy file. Remember to run "/etc/init.d/hipdnsproxy restart" to make the changes effective. For example, including --hip-domain-prefix="hip." can speed up the DNS resolution because it tries to resolve HITs only when the host name begins with the "hip." string. Also, the DNS proxy returns HITs or empty DNS responses to the application as an extra security measure when the prefix matches.
The DNS proxy does not return IP addresses when it finds a HIT for a queried host. If you want to see the IP addresses, try "dig -t any hostname". Intentionally, the DNS proxy does not alter ANY requests for diagnostics and debugging purposes.
The tools/hipdnskeyparse directory contains a script which converts public key file contents to different DNS zone file formats. To convert to unpatched BIND9 format, run the following:
hipdnskeyparse < /etc/hip/hip_host_rsa_key_pub.pub hostname.domain.org | sed -n -e '/^9BIND */s///p'
This outputs a line which can be inserted to a zone file. Similarly, with sed command:
.... | sed -n -e '/^DJBDNS */s///p'
a line for Dan Bernstein's tinydns is output. For further information, please refer to hipdnskeyparse and myasn.py.
The goal of Dynamic DNS extensions is that a local host can establish initial contact with a peer host when the local host knows only the HIT of the peer but not the IP address or domain name. The extensions do not provide hostname-to-HIT look up support (see section the section called “DNS Proxy”), just HIT-to-IP look up.
Currently HIP daemon performs HIP name resolution in the following order:
in /etc/hip/hosts
in /etc/hosts
in hit-to-ip.infrahip.net zone
With "hipconf daemon hit-to-ip on", the HIP daemon uses IP addresses of 5.7.d.1.c.c.8.d.0.6.3.b.a.4.6.2.5.0.5.2.e.4.7.5.e.1.0.0.1.0.0.2.hit-to-ip.infrahip.net. to contact peer host with HIT 2001:1e:574e:2505:264a:b360:d8cc:1d75
Default hit-to-ip.infrahip.net. suffix can be changed with "hipconf daemon hit-to-ip-set <new.hit-to-ip.zone.>. Please note it is independent from HIT_TO_IP_ZONE in /etc/hip/nsupdate.conf"
With "hipconf daemon nsupdate on", the HIP daemon also maintains records in hit-to-ip.infrahip.net. Once you start hipd, it will call nsupdate with HIT and IP address for every HIT of your host. It is executed upon mobility events (i.e. address changes) later on. There is an example of update query:
update delete 5.7.d.1.c.c.8.d.0.6.3.b.a.4.6.2.5.0.5.2.e.4.7.5.e.1.0.0.1.0.0.2.hit-to-ip.infrahip.net
update add 5.7.d.1.c.c.8.d.0.6.3.b.a.4.6.2.5.0.5.2.e.4.7.5.e.1.0.0.1.0.0.2.hit-to-ip.infrahip.net 1 IN A 193.167.187.1
update add 5.7.d.1.c.c.8.d.0.6.3.b.a.4.6.2.5.0.5.2.e.4.7.5.e.1.0.0.1.0.0.2.hit-to-ip.infrahip.net 1 IN AAAA 2001:708:140:220:215:60ff:fe9f:60c4
hit-to-ip.infrahip.net used for experiments has HIT in SOA record, therefore updates are sent to HIT and cause HIP base exchange with the master DNS server. Your system should resolve its location by HIT. After the base exchange update is submitted via HIP, which allows DNS server to authenticate the clients and permit updates only of their own location. Changes made to ISC BIND can be found in patches/bind directory.
We also try to assign domain name pointers for HITs. On daemon start nsupdate will query 5.7.d.1.c.c.8.d.0.6.3.b.a.4.6.2.5.0.5.2.e.4.7.5.e.1.0.0.1.0.0.2.ip6.arpa and send update if needed. Unfortunately we modify information in 1.0.0.1.0.0.2.ip6.arpa only on our DNS server as we do not have global delegation yet.
Table of Contents
Abstract
In this chapter, we guide how to test the Host Identity Protocol rendezvous and relay mechanisms.
The rendezvous and relay extensions extend HIP and the HIP registration extension for initiating communication between HIP nodes via a HIP rendezvous server or a HIP relay server. The rendezvous server (RVS) and the HIP relay server serve as an initial contact point ("rendezvous point") for its clients. The clients of an RVS / HIP relay server are HIP nodes that use the HIP Registration Protocol to register their HIT to IP address mappings with the server. After this registration, other HIP nodes can initiate a base exchange using the IP address of the server instead of the current IP address of the node they attempt to contact. Essentially, the clients of a server become reachable at the server's IP addresses.
The primary objective of the rendezvous extension is to improve reachability and operation when HIP hosts are mobile or multi-homed. In addition, the rendezvous extension is necessary when a middlebox separates the responder from the public realm. In a Network Address Translator (NAT), session establishment is uni-directional from private address realm to public address realm. Therefore, if a host has detected that it is behind a NAT, the host must first register with the RVS when it is going to act as a responder of a base exchange. The rendezvous extension allows HIP initiators to reach the responder when the NAT devices involved all perform address independent mapping. Such NATs are commonly referred to as "good" NATs.
HIPL has two experimental relay modes serving NAT traversal purposes. In the first mode, the HIP control plane relay supports Native NAT Traversal Mode for HIP which is only partially supported at the moment. The core idea is that two end-points are behind two different NAT boxes and use a HIP control plane relay to be able to contact each other to exchange their locators. Then the hosts "punch holes" to their NAT boxes to establish direct end-to-end connectivity with each other. The second mode, "full-relay" is supported completely and it relays both HIP and ESP traffic. You should use it carefully and whitelist your /etc/hip/relay.conf file. Otherwise you risk your host becoming an open HIP and ESP relay. For additional security measure, you can also use also /etc/hip/hipfw.conf to further restrict the allowed clients and servers by their HITs.
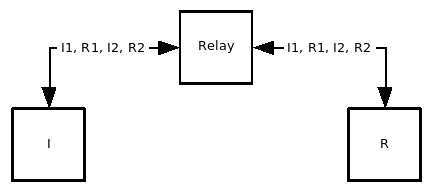
The main difference between the rendezvous server and the HIP relay server is that the RVS only relays I1 packet of the base exchange while the HIP relay server relays all HIP packets. We can summarize the use cases of the RVS and the HIP relay as follows.
The rendezvous server should be used when:
The responder is mobile or multi-homed.
A NAT device that performs endpoint independent mapping separates the responder from the public Internet.
The HIP relay server should be used when:
A NAT device that performs endpoint dependent mapping is en route between the initiator and the responder. Note that it does not make a difference whether the NAT device is at initiator's side or at responder's side. A single "bad" NAT en route is enough to make the communication impossible between the initiator and the responder unless a HIP relay is used.
Abstract
In this section, we show how to edit the configuration file: "/etc/hip/relay.conf".
The rendezvous server and the HIP relay server are configured using a configuration file: "/etc/hip/relay.conf". Note, that this file is server side configuration file i.e. you only need to configure the file at the relay or rendezvous server, not at the client. This file is shared between the RVS and the HIP relay because both of these services use the same internal database to store the HIT to IP address mappings. A default configuration file is created once the HIP daemon is started the first time, thus if the daemon has not been started before, please start and stop the daemon once to create the default file.
In the configuration file we have the following options:
            whitelist_enabled = "yes"
            whitelist = ""
            minimum_lifetime = "60"
            maximum_lifetime = "3600"
HIPL supports RVS / HIP relay server client white listing which means that only those clients whose HITs are listed in the white list are allowed to register to the RVS / HIP relay server. Before R can register with the server, R's HIT must be added to the white list. To do this, please start the HIP daemon at the responder and use the "hipconf" tool from another shell at the responder to get the default hi:
hipconf daemon get hi default
Now, add this HIT in between the white list quotation marks in the configuration file of the RVS / HIP relay server:
whitelist = "2001:0018:8321:4e1a:c009:1ff8:fed4:8e9c"
where 2001:0018:8321:4e1a:c009:1ff8:fed4:8e9c is the HIT of the responder. Multiple HITs are separated with commas:
whitelist = "2001:0018:8321:4e1a:c009:1ff8:fed4:8e9c","2001:11:91e3:528e:7c41:9560:82ae:630f"
Alternatively you can add multiple HITs by adding multiple "whitelist" stanzas:
            whitelist = "2001:0018:8321:4e1a:c009:1ff8:fed4:8e9c"
            whitelist = "2001:0011:91e3:528e:7c41:9560:82ae:630f"
If you do not wish to filter the clients who are granted access to the rendezvous and HIP relay services, you can disable the white list:
whitelist_enabled = "no"
When the white list is disabled, it does not matter if you have HITs listed in the white list or not since every HIT is allowed to register. Finally, you can set the boundary values for the time window limiting the service lifetime:
            minimum_lifetime = "60"
            maximum_lifetime = "3600"
These values are seconds. The registration extension, however, uses an 8-bit encoding to represent the lifetimes. See notes for details on the lifetime formula.
Server side commands i.e. commands run on the server.
If you have already started a HIP daemon that functions as an RVS or a HIP relay server and you have to add values to the white list or otherwise modify the configuration file, you can reinitialize the server without restarting the daemon itself using the "hipconf" tool:
hipconf daemon reinit service rvsor
hipconf daemon reinit service relayThe reinitialization does not have any effect on the existing RVS / HIP relay server clients, but only affects clients registering after the reinitialization.
The values that are given in the configuration file are used to calculate the real life time and therefore do not represent the exact life time as such. The formula for the calculations is given in RFC 5203: Host Identity Protocol (HIP) Registration Extension:
seconds = 2^((lifetime - 64)/8)Using this formula we can get the lifetime value:
lifetime = (8 * (log(seconds) / log(2))) + 64For the aforementioned default values in seconds (60 and 3600) we get lifetime values 112 and 158 (using ceil() for lower boundary and floor() for higher boundary). These lifetime values correspond to 64 and 3444 respectively. Therefore, when you have values 60 and 3600 seconds in the configuration file, you will effectively end up having lifetime value boundaries of 64 and 3444 seconds.
Abstract
In this section, we show how to use the rendezvous server to establish a HIP connection between two HIP hosts using nc6.
Before you test the rendezvous mechanisms, you should have run the base exchange once without the rendezvous server to get familiar how the "/etc/hosts" and "/etc/hip/hosts" files are configured. Please see the section called “For Hackers: How to Test HIP Connectivity from the Command Line using two Locally-Connected Hosts” for information on how to run a base exchange without the rendezvous server. Also, before you can test the rendezvous mechanism, the configuration file must be edited appropriately, see the section called “The RVS and HIP Relay Configuration File” for more information.
The rendezvous server is similar to the home agent in Mobile IP. The rendezvous server provides a stable IP address for the responder and forwards the initial I1 packet to the current location of the responder. The idea is that I wants to connect to R's HIT but only knows RVS' IP address (and that RVS is representing R).
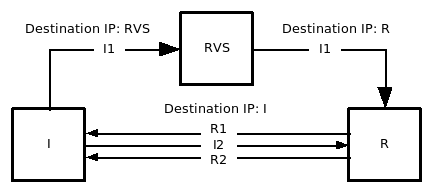
Base exchange via the rendezvous server. I = Initiator, RVS = RendezVous Server, R = Responder
First, the "/etc/hosts" and "/etc/hip/hosts" files are configured. Please notice that you can leave all non-HIP-related values in "/etc/hosts" intact.
INITIATOR
In the "/etc/hosts" file you should have: <RVS IP> <RESPONDER NAME>. In other words the responder's host name is mapped to the IP address of the rendezvous server. It is important that the responder's host name is NOT mapped to responder's IP address. Otherwise the rendezvous server is not used at all!
In the "/etc/hip/hosts" file you should have: <RESPONDER HIT> <RESPONDER NAME>. This is the line that you would have in a normal base exchange execution not involving an RVS. Please make sure that you use the same HIT here as <RESPONDER HIT> as what the "hipconf daemon get hi default" outputs at the responder.
RVS
Both files, "/etc/hosts" and "/etc/hip/hosts", are left blank. The files are left blank because the rendezvous server is assumed to have no information of its clients beforehand. The RVS can have some white listed HITs as beforehand information, however, but it is not required to have none whatsoever. Using the white list to filter HITs is local policy and as such is not part of the registration procedure.
RESPONDER
At the responder, both files,"/etc/hosts" and "/etc/hip/hosts", are left blank also. The responder is assumed to know the IP address and the HIT of the rendezvous server, but this information is given as command line parameters of the "hipconf" tool.
You are now ready to test the actual connection establishment. You will need two shells open on each host, one for the HIP daemon and other for the hipconf tool:
Start HIP daemon at each host:
hipd
At the rendezvous server, we have to indicate that we are willing to offer rendezvous service:
hipconf daemon add service rvs
At the responder, we have to register to the rendezvous server:
hipconf daemon add server rvs [RVS-HIT] <RVS-IP or hostname> <LIFETIME-IN-SECONDS>
This will launch a base exchange i.e. establish a HIP SA between the rendezvous server and the responder. Please use the default HIT of the rendezvous server ("hipconf daemon get hi default" at the RVS). The <LIFETIME-IN-SECONDS> value represents the number of seconds we would like our service registration to last, but it is not necessarily the number of seconds we are granted the service. Notice that opportunistic mode will be used if you don't specify rendezvous HIT.
At the responder, start a server listening for incoming connections (5000 is an example port number):
nc6 -l -p 5000
At the initiator, start a client:
nc6 <RESPONDER-HOSTNAME> 5000
At the initiator, type some text and press CTRL + d. If everything works as it should, the typed text should now be echoed at the responder.
Server side commands i.e. commands run on the rendezvous server.
To cancel the rendezvous service (without killing the HIP daemon) type:
hipconf daemon del service rvsThis will delete all existing rendezvous server registrations and remove the rendezvous service from the offered services.
To reinitialize the rendezvous service after modifications to the configuration file (without killing the HIP daemon) type:
hipconf daemon reinit service rvsThe changes that you have made to the configuration file affect the clients registering after the reinitialization.
Client side commands i.e. commands run on the responder (rendezvous server client).
To cancel the registration to the rendezvous service type:
hipconf daemon del server rvs <RVS-HIT> <RVS-IP>This will send a HIP message asking for rendezvous service cancellation to the rendezvous server.
The rendezvous service implementation is based on RFC 5204: Host Identity Protocol (HIP) Rendezvous Extension and RFC 5203: Host Identity Protocol (HIP) Registration Extension.
At the time of writing this section, the UPDATE packet implementation of HIPL was under heavy renovation. Therefore the RVS extension does not have UPDATE packet support. Effectively this means that the current rendezvous service implementation uses base exchange packets to signal any changes in the service status.
For example, when you register to the RVS service and then cancel the service, the HIP daemon will launch a base exchange for both the service registration and the service cancellation. According to RFC 5203 the service cancellation should use UPDATE packets since there already is a HIP connection between the client and the server.
The rendezvous server relays only the I1 packet. Once the I1 packet has been successfully relayed to the responder, the responder sends an R1 packet directly to the initiator and the initiator learns the responder's location from the IP header of the R1 packet. Therefore, all successive traffic flows directly between the initiator and the responder.
The initiator does not yet store the IP addresses received in the VIA_RVS parameter encapsulated in R1 packet. This means that the double jump scenario does not work.
The responder does not yet store the granted service lifetime anywhere.
NOTE:
The HIP relay mechanisms are experimental and you should always couple it with the access control mechanisms of hipfw to avoid becoming an open relay. Please also note that the control and data plane relaying have to be enabled separately (the former in hipd and the latter in hipfw).
Abstract
In this section, we show how to use the relay server to establish a HIP connection between two HIP hosts using nc6.
Before you test the relay mechanisms, you should have run the base exchange once without the relay server to get familiar how the "/etc/hosts" and "/etc/hip/hosts" files are configured. Please see the section called “For Hackers: How to Test HIP Connectivity from the Command Line using two Locally-Connected Hosts” for information on how to run a base exchange without the relay server. Also, before you can test the relay mechanism, the configuration file must be edited appropriately, see the section called “The RVS and HIP Relay Configuration File” for more information.
The HIP relay server is intended to be a foolproof method to contact the responder. When the responder has registered to the HIP relay, the responder can be contacted regardless of the network address translators en route between the initiator and the responder. The HIP relay server provides a stable IP address for the responder and forwards all HIP control packets to the current location of the responder.
The idea is that R wants to be reachable on Host Identity Protocol but R is located behind a NAT device that performs address dependent mapping. The only way to reach R, is to relay all HIP control traffic via a HIP relay. How R finds out that it is behind a NAT device that performs address dependent mapping is irrelevant in this context and is therefore beyond scope.
In this section, we show how to use the HIP relay server to establish a HIP connection between two HIP hosts using nc6.
Base exchange via the relay server
First, the "/etc/hosts" and "/etc/hip/hosts" files are configured. Please notice that you can leave all non-HIP-related values in "/etc/hosts" intact. The configuration of these files is identical with the RVS test case, thus if you have already tested the RVS and you are using the same HIP hosts to test the HIP relay, you don't have to edit these files at all but can start testing the connection establishment right away. If you haven't tested the RVS mechanism, and thus need to configure the files to test the relay mechanism, please see RVS configuration for instructions.
You are now ready to test the actual connection establishment. You will need two shells open on each host, one for the HIP daemon and other for the hipconf tool:
Start HIP daemon at each host:
hipdAt the relay server, we have to indicate that we are willing to offer HIP relay service (control plane only):
hipconf daemon add service relayIf the relay server should forward also ESP (data plane), you must enable it separately by restarting hipfw and include the -r option:
hipfw -bklpFrAt the responder, we have to register to the relay server:
hipconf daemon add server relay <RELAY-HIT> <RELAY-IP> <LIFETIME-IN-SECONDS>This will launch a base exchange i.e. establish a HIP SA between the relay server and the responder. Please use the default HIT of the relay server ("hipconf daemon get hi default" at the relay server). The <LIFETIME-IN-SECONDS> value represents the number of seconds we would like our service registration to last, but it is not necessarily the number of seconds we are granted the service.
At the responder, start a server listening for incoming connections (5000 is an example port number):
nc6 -l -p 5000At the initiator, start a connection test client:
nc6 <RESPONDER-HOSTNAME> 5000At the initiator, type some text and press enter. If everything works as it should, the typed text should now be echoed at the responder.
Server side commands i.e. commands run on the relay server.
To cancel the relay service (without killing the HIP daemon) type:
hipconf daemon del service relayThis will delete all existing relay server registrations and remove the relay service from the offered services.
To reinitialize the relay service after modifications to the configuration file (without killing the HIP daemon) type:
hipconf daemon reinit service relayThe changes that you have made to the configuration file affect the clients registering after the reinitialization.
Client side commands i.e. commands run on the responder (relay server client).
To cancel the registration to the relay service type:
hipconf daemon del server relay <RELAY-HIT> <RELAY-IP>This will send a HIP message asking for relay service cancellation to the relay server.
The relay service implementation is based on version 04 of the Internet Draft: Basic HIP Extensions for Traversal of Network Address Translators and RFC 5203: Host Identity Protocol (HIP) Registration Extension.
At the time of writing this section, the UPDATE packet implementation of HIPL was under heavy renovation. Therefore the relay extension does not have UPDATE packet support. Effectively this means that the current relay service implementation uses base exchange packets to signal any changes in the service status.
For example, when you register to the relay service and then cancel the service, the HIP daemon will launch a base exchange for both the service registration and the service cancellation. According to RFC 5203 the service cancellation should use UPDATE packets since there already is a HIP connection between the client and the server.
The responder does not yet store the granted service lifetime anywhere.
Abstract
In this section, we discuss some issues in RFC 5203 as well as reveal some additional RVS and HIP relay features of HIPL.
Unfortunately RFC 5203: Host Identity Protocol (HIP) Registration Extension has some vaguely defined instructions. Some may call them features, some unanswered questions and some just plain design faults. What ever the case, we have had to take into account these issues when implementing the registration extension. We present these issues next:
While RFC 5203 provides us a way to request more than one service using single base exchange or UPDATE packet exchange, it does not provide us a way to do so using different lifetime boundaries. The REG_REQUEST and REG_RESPONSE parameters include only one lifetime field and thus we would need to use multiple parameters to request multiple lifetimes. In RFC 5203 it is said, however:
"The requester MUST NOT include more than one REG_REQUEST parameter in its I2 or UPDATE packets..."
"The registrar MUST NOT include more than one REG_RESPONSE parameter in its R2 or UPDATE packets..."
RFC 5203 provides us no instructions how to deal with REG_INFO, REG_REQUEST or REG_RESPONSE parameters that include duplicate "Reg Type" values, i.e. for example the registration type of RVS listed twice in one parameter.
RFC 5203 provides us no instructions how to deal with failed registration cancellations. That is, how should the client react when the server responses with a REG_FAILED parameter to a REG_REQUEST parameter having lifetime of zero?
These are the HIPL solutions for the three issues presented in the previous section:
The client cannot request multiple lifetimes. You can input only a single lifetime to "hipconf".
The server, on the other hand, uses the first given lifetime boundaries for every offered service in REG_INFO parameters (If "/etc/hip/relay.conf" would provide a way to define individual lifetime boundaries for each service, the boundaries listed first would be used for every service).
If the client receives an REG_RESPONSE parameter with duplicate "Reg Types", it processes each registration type one after other. It is up to each service how the service reacts to a duplicate response. If the server receives an REG_REQUEST parameter that includes duplicate "Reg Types", the whole parameter is silently dropped.
Receiving a REG_FAILED as an response to a service cancellation is handled exactly the same was as a REG_FAILED received as an response to a service request. That is, the client just assumes that the server is not able to provide the requested service.
Client side commands i.e. commands run on the responder (server client).
Although HIPL currently only supports RVS, relay and escrow services, you can request for any service using the "hipconf" tool. This feature is provided for testing purposes, especially to test how HIPL reacts with other HIP implementations that have the registration extension implemented.
The services are identified by "Reg Types" i.e. numbers between 0 and 255 (both inclusive). Instead of using the predefined strings, you can use these service numbers to request a service. For example, to request a service identified by number 1 (the rendezvous service), you can type
hipconf daemon add server 1 <SERVER-HIT> <SERVER-IP> <LIFETIME-IN-SECONDS>Notice, however, that if the server does not support the service you have requested, a request is never sent.
To request multiple services using one service request you can chain the service types. For example, to request services identified by registration types 3, 10 and 245 you can type:
hipconf daemon add server 3 10 245 <SERVER-HIT> <SERVER-IP> <LIFETIME-IN-SECONDS>Using this chaining method one can request up to ten services with one REG_REQUEST parameter.
To cancel multiple service registrations using one service request you can chain the service types as with registration.
hipconf daemon del server 3 10 245 <SERVER-HIT> <SERVER-IP>Using this chaining method one can request up to ten service cancellations with one REG_REQUEST parameter.
This section describes how to use the HIP firewall.
If firewall is killed, it leaves rules dangling which may drop some traffic. Check with "iptables -L -n" if there are some HIPFW rules there and no hipfw running ("ps axu | grep hipfw"). You can flush the rules with "hipfw -k" and then pressing CTRL + C. Alternatively, you can just run "/etc/init.d/hipfw stop".
Firewall can be started with "hipfw <file_name>". By default, it drops all HIP traffic and allows all other traffic. You can change the defaults with hipfw command line flags. To get a list of command line flags, give the -h option to hipfw. When you start the firewall the first time, it creates /etc/hip/firewall.conf file which contains an example usage template.
The hipfw must be started before hipd. The correct way to shutdown is to stop hipd first and hipfw then. If you are running the hipfw in a router, you may also need to set /proc/sys/net/ipv6/conf/all/forwarding and /proc/sys/net/ipv4/conf/all/forwarding to 1.
Rules follow (loosely) the syntax of Linux Iptables with following syntax.
Basic format of rule is: HOOK [match] TARGET
Here HOOK is one of the netfilter hooks: "INPUT", "OUTPUT", "FORWARD". Target is either "ACCEPT" or "DROP", whether packet should be allowed or not. Match is a combination of filtering option described below.
Filtering options:
- -src_hit [!] <hit value> --hi <file name>
Matches source HIT of packet. HI can be given with --hi option and by defining path to a public key file as an argument. This causes sender signatures to be verified. The file name must contain either "_rsa_" or "_dsa_" to define whether RSA or DSA is used as algorithm.
- -dst_hit [!] <hit>
Matches destination HIT of packet.
- -type [!] <hip packet type>
Matches HIP packet type. Type is one of following: "I1", "R1", "I2", "R2", "CER", "UPDATE", "NOTIFY", "CLOSE", "CLOSE_ACK"
- -i [!] <incoming interface>
Matches incoming interface. Argument contains name of the interface. Can not be used for rules in OUTPUT hook as packet has no incoming interface in that case.
- -o [!] <outgoing interface>
Matches outgoing interface. Argument contains name of the interface. Can not be used for rules in INPUT hook as packet has no outgoing interface in that case.
- -state [!] <state> --verify_responder --accept_mobile --decrypt_contents
Matches state of HIP association: "NEW" or "ESTABLISHED". ESP packets are also filtered as part of the connection. With "--verify_responder" option the firewall stores responder HI from R1 packet and uses it for verifying signatures in the packets. With --accept_mobile option, the firewall may establish state for existing connection when a mobile host enters the network protected by the firewall. Please see the section called “Hackers Guide to Testing Handovers Manually” to see how mobility events can be tested.
If you get "No buffer space available" errors, please disable all of the firewall debug messages (./configure --disable-debug; make clean all). This can occur when moving large files and the firewall cannot serve with sufficient speed when it has to display debug messages.
Management interface:
Firewall management interface contains functions for altering rules of running firewall. Functions are defined in hipfw/rule_management.h and implemented in hipfw/rule_management.c. rule_management.c also contains functions for copying, comparing and freeing rules, etc. If any functions are needed outside the rule_management, they can be defined in the header file.
The argument "hook" in the rule is the Netfilter hook for which rule is intended. The hooks are defined in linux/netfilter_ipv6.h as NF_IP6_LOCAL_IN, NF_IP6_FORWARD, NF_IP6_LOCAL_OUT.
The argument rule is structure describing the rule defined in rule_management.h. The structure contains pointers to options. The pointer value must be NULL, when option is not defined. The structures for options are also defined in rule_management.h. Function: rule * parse_rule(char * string) can be used for creating a rule structure from a string. This also inspects that the rule syntax is correct.
void insert_rule(const struct rule * rule, int hook): Inserts argument rule into with the hook. Insert makes local copy of the argument rule.
int delete_rule(const struct rule * rule, int hook): Deletes the local rule that is equal to the argument rule.
GList * list_rules(int hook): creates a copy of the rule list and returns it. Caller must take care of freeing the returned list.
int flush(int hook): Clears all rules.
Table of Contents
HIPL supports also initiating connections from behind a NAT. The basic idea is that the initiator encapsulates HIP control packets and ESP data packets within UDP. This way, the packets can traverse the NAT box. However, both the initiator and responder have to support NAT extensions in order to make this work. Currently, the responder cannot be located behind a NAT.
The NAT traversal can be experimented in a similar way as depicted in earlier sections. The only difference is that you have to tell the initiator manually that it is behind a NAT using "hipconf daemon nat on". After this, you can initiate the base exchange according to the previous instructions. The manual configuration is currently required because support for automatic NAT detection (STUN) has not been implemented yet.
If you have problems in even getting I1 triggered using NAT code e.g. with nc6 (occurred on 2.6.16.5 kernel version), you may have to specify the source HIT explicitly. The procedure to initiate a connection behind NAT is as follows:
hipconf daemon nat plain-udp
hipconf daemon add map peer_hit peer_ipv4_addr
ping6 -I source_hit dst_hit
Three cases of mobility of the initiator have been implemented for the NAT code.
Mobility from behind NAT to behind the same NAT: For this case, the use the standard procedure for update after the base exchange is completed. The update would be UDP encapsulated.
Mobility from public addressable network to behind NAT: Once a hip association is set up between two hosts, both on the public network and one of them wishes to move behind a NAT, then that node should first delete the public ip address, then turn the NAT on using hipconf and then add the ip address behind NAT along with the route to the interface. The update would be done using UDP now and future communications would be UDP encapsulated (both HIP control traffic and ESP packets).
Mobility from behind NAT to publicly addressable network: If a node has setup hip association from behind NAT and now wishes to move to public IP domain, then it should first delete the ip behind NAT, turn off the NAT using hipconf and then add the public IP along with the route to the interface. HIP association then would not use UDP encapsulation and the update would be done using normal HIP packets (without UDP encapsulation).
Teredo is a traversal solution for HIP. You can experiment with Teredo by installing the Miredo client software. Then, establish HIP connections to Teredo addresses (check ifconfig teredo) at the client side as instructed in the section called “For Hackers: How to Test HIP Connectivity from the Command Line using two Locally-Connected Hosts”. As Teredo is a NAT traversal solution by itself, you don't have use UDP encapsulation for HIP (hipconf daemon nat none).
See http://www.cs.helsinki.fi/u/sklvarjo/miredo.htm for further information on Teredo configuration with HIP. Table 3.1, “Test Servers” lists addresses of the public InfraHIP test servers with Teredo addresses. The servers provide also free rendezvous service that can be combined with Teredo.
Table of Contents
At the protocol level, HIPL implements the HIP_CERT parameter as defined in RFC 6253. Specifically, X509 certificates are supported, whereas no functionality is provided for SPKI certificates. HIP does not define the usage of certificates in the protocol exchange. In HIPL, we currently add certificates to the R2 in the BEX and the second update message U2 (e.g. during the mobility-triggered update exchange). The HIP firewall verifies the certificate in the R2 and U2 if configured accordingly. If your use case requires certificates to be included in different messages, changes in the source code will be necessary.
For the following guide, we assume a setup consisting of three machines (A, B, and C), where B is situated on the forwarding path between A and C. A and C execute the hipd, while B executes the hipfw. The hipd automatically adds a certificate to R2s and U2s if a file called host-cert.der is located in /etc/hip. The hipfw checks for certificates if certificate-based rules exist in /etc/hip/hipfw.conf.
To set up certificates, you have to perform the following steps:
Generate a root certificate in PEM format (e.g. with OpenSSL).
Copy the root certificate to /etc/hip/ca-root-cert.pem on B.
Add a certificate-based rule to /etc/hip/hipfw.conf on B (e.g. 'FORWARD -cert /etc/hip/ca-root-cert.pem ACCEPT').
Generate a certificate in DER format for the HI used by C and place it at /etc/hip/host-cert.der on C.
No changes are required for A if its role is restricted to an initiator. Otherwise, A requires the same setup as C.
The setup of a certificate-based network scenario can be vastly simplified by using a fourth HIPL-enabled host D as the certificate authority. In this case, generate the root certificate on D by running:
openssl req -new -x509 -key /etc/hip/hip_host_rsa_key_pub -out ca-root-cert.pem
NOTE: Apart from the common name, all fields in the certificate can be empty. The common name must contain the HIT of D.
Now, run a BEX between C and D. After the BEX has succeeded, run the following command on D as root in order to generate the certificate for C:
hipconf acquire certificate #HIT_OF_C# > host-cert.der
As the final step, copy the certificates to the places mentioned in the guide above.
There are a couple of things that may go wrong in a certificate-based setup. The most common ones are listed below. Please, make sure to check the listed items before asking questions on the hipl-users mailing list.
Ensure that the certificates have not yet expired (e.g. by checking the certificate lifetime with OpenSSL).
Validate that the time is set correctly on all hosts.
Verify the certificate chain consisting of root-ca-cert.pem and host-cert.der with an external tool (e.g. with OpenSSL).
Table of Contents
HIP dual-version support allows a host to run HIPv1 and HIPv2 as a dual stack. Based on the version number of received I1 messages, the host automatically determines the HIP version for this peer. The version is decided separately for each host association, which means the host can have a HIPv1 association with one peer, while maintaining a HIPv2 association with another peer.
HIP dual-version support also enables a host to choose the default HIP version for HIP association initiation. This behavior can be configured via both the hipd configuration file and the hipconf command line tool.
The configuration parameter: hip-default-version in the hipd.conf file accepts two values: 1 and 2, which stand for HIPv1 and HIPv2 respectively. If the hipd cannot find this parameter in the configuration file, HIPv1 will be used as default value.
Modification of the configuration parameter: hip-default-version in the hipconf command line takes effect immediately and no restart of the daemon is required. Any HA before the modification remains unchanged and all new HIP initiation messages (I1 message) will be switched to the version given by the hipconf command. Below is an example of setting the parameter to HIPv1. To use HIPv2, change the value from 1 to 2.
hipconf daemon default-hip-version 1
Table of Contents
At the protocol level, the extension allows sending multiple I1 or UPDATE-with-locator packets sequentially. The idea is to scan through all possible source and destination IP pairs at the HIP layer to improve the chances for successful initial contact (I1) and to reestablish contact (UPDATE-with-locator) in way similar to the NAT-ICE extensions. We have playfully called the extension as "shotgun" mode in the implementation.
The obvious difference to ICE is that the shotgun mode works at the HIP protocol layer. A non-obvious difference is that the approach supports also fault-tolerance for a single relay/rendezvous (Responder's RVS has crashed) and it can make use of multiple relay/rendezvous servers for better redundancy. At the moment, neither of these are possible directly with the ICE-NAT extensions. I actually believe the shotgun approach can be applied even with the ICE-NAT extensions to improve fault-tolerance.
The shotgun approach seems useful to improve fault-tolerance with an without (single or multiple) rendezvous/relay middleboxes, but there is also another use case for this. The Initiator (or Mobile Node) can learn multiple mappings for the peer, some of which may have connectivity and some not. It is also possible that a malign user intentionally sends invalid mappings for a well-known service in a multiuser system (this case also requires some rate control for mappings per user). In such scenarios, it is useful to try multiple peer addresses sequentially instead of just single one.
The shotgun extension can be enabled as follows:
hipconf daemon shotgun on
The same line can be also included in /etc/hip/hipd.conf without the "hipconf daemon" prefix.
At the time of writing this, the shotgun extension did not yet work with UPDATE.
Libhipl provides HIP functionality as a library for upper layer applications without requiring the HIPL daemon. Instead, HIP control messages are transmitted on top of TCP/UDP. From the applications' point of view, there is an API similar to the normal socket API. This section describes the libhipl API.
The libhipl API is described in "lhipl.h". Detailed information about each function is available there.
Libhipl initialization. Libhipl requires initialization before calling any other related functions. The function: hipl_lib_init_all() serves this purpose and different debug levels can be set as its parameters to track problems inside the library.
Name-based API. Compared to standard socket API, one apparent difference in Libhipl is that a peer is specified by giving a peer name and a port number instead of a sockaddr data structure. The peer name is a string representation of the peer. Currently, libhipl only supports a HIT string as peer name.
Libhipl socket creation. The function hipl_socket() creates a new libhipl socket. An ID is assigned to each created libhipl socket and returned by this function, then the caller can pass this ID to other libhipl functions to operate on this libhipl socket. NOTE: there is NO relation between libhipl socket IDs and normal socket file descriptors, and the result of using this ID as file descriptor is undefined.
Setup TCP connection. When using libhipl in TCP mode, TCP connection setup is the first task. Similar to the normal socket syntax, libhipl provides: hipl_connect(), hipl_listen() and hipl_accept() for this goal. Those functions process the 3-way handshake and establish a TCP connection.
libhipl Base Exchange (BEX) and user data transmission. Data transmission is handled by hipl_sendto() and hipl_recvfrom(). In libhipl, The first sending data call triggers BEX and the first receiving call waits for an incoming BEX message. Once BEX succeeds, the pending user data is transmitted to the peer side. This BEX process is handled by libhipl automatically by default. Meanwhile, there is also an advanced way to handle BEX step by step, which will be explained bellow.
libhipl assistant API.
hipl_add_peer_info() adds the peer's HIT and IP address mappings to the database of libhipl. The library can use this information to look up a peer's locator when a peer name is given.
hipl_lib_set_bex_feedback(): This function turns the step-by-step process of BEX on/off. By default, BEX feedback is off. When it is on, sending/receiving functions only process one BEX messages at a time, and give different return values to notify the progress of BEX.
Libhipl sample program. For a libhipl usage example, refer to the check_libhipl program in the test directory.